Wednesday, November 16, 2011

Thanksgiving

Lil Cinnamon is taking up a lot more time than I had imagined so I haven't done anything creative in quite a while.  (Don't take that as me complaining because I couldn't be happier being at her beck and call 24 hours a day.)  We finally got her sleeping longer stretches throughout the night so I'm starting to feel like myself again.  A special shout out to Mr. Sangria for helping me get her to sleep.  Let's just say he was consoling two crying ladies in our house this weekend.

Anyway the holidays are upon us.  I can't believe it!  I'm not ready!  Not that I have anything that I need to be ready for.  We are pretty low key around here. 

My favorite holiday is Thanksgiving.  Love it!  It's about being with friends and family and not stressed out about presents, etc.  Which is why it burns me up that they are already playing Christmas music on the radio and every other commercial on TV is a holiday one.  Even in the day of DVRs I still watch the occasional commercial when I can't reach for the remote while feeding Lil Cinnamon.

RESPECT THE TURKEY!! - coming from a vegetarian.  :)
So in honor of my favorite holiday I thought I'd share some Thanksgiving/fall love.


All images taken from Pinterest.


Tuesday, October 25, 2011

Candy Corn Anyone?

How about if it looked like this?

Honestly I wasn't going to dress up Lil Cinnamon for Halloween.  I figured she will only be 8 weeks and quite frankly she's still a little blobby so what's the point.  That was the sleep deprived me.  Once I had my usual 8 cups of coffee the regular me kicked in and realized I would regret it forever if I didn't dress her up in something.  And really aren't babies the cutest when they are dressed up?  I 100% believe it's perfectly acceptable to dress your baby up in something with ears for no reason at all.  Hoodies with bear ears, bunny ears on a bathrobe, etc.
But I don't have time to come up with an elaborate costume.  A friend sent me a picture of a baby dressed as a candy corn and I knew that's what I had to make. 
Because it was so easy I thought I'd share how I made it with you in case you want to do the same.  It took a little over an hour and cost around $15 if that.  Easy peasy.

First I bought 1/2 yard each of yellow, orange, and white fleece.  I chose fleece because you don't have to finish the cut edges.  You won't need that much white fleece but I always buy more just to be on the safe side.  
Also I purchased an invisible zipper.  A 14 inch zipper should do the trick.

Depending on the height of your purchased fleece you might be able to cut it in half which I did.  Then I sewed the yellow and orange fleece together lengthwise.
I folded the sewn piece over in half and place a sleep sack that I had over it and traced.  If you don't have a sleep sack you can just freestyle this drawing. It doesn't have to be perfect, just try to make it look like the bottom of a candy corn. 


Take one piece and cut a slit about 12" long for a 14" zipper.  This isn't an exact science, just make sure your zipper is longer than the slit.
A lot of people are intimidated by invisible zippers but you don't have to be.  And explaining how to install it is much harder than actually doing it.  **Please note that you'll need an invisible zipper foot for your sewing machine.  If you have one you probably already know how to install one.  If not don't worry, you can use a regular zipper or buttons, ties, etc.  Get creative.

Open the zipper and place it on the left garment piece, on the outside of the fabric, with the wrong side of the zipper facing up.  I lined up the zipper tape with the edge of the slit.  Place the lefthand groove of the zipper foot over the coils of the zipper and sew.

Next, you will sew the other  half of the zipper to your fabric. Line up the top of the zipper and top of your fabric, just opposite as before.  Make sure the end of the zipper tape matches the cut side of the fabric.  Again as a reminder, you should be looking at the outside of your garment but looking at the wrong side of the zipper.


Turn the zipper into the fabric and zip up. If you need more detailed instructions there are countless Youtube videos.  Check them out!


Then place the front and back side of the body together with the wrong sides facing out.  Sew around the body with a 1/4" seam allowance making sure to not sew the arm and neck holes together like I almost did!  Turn inside out and you are done with the body.  Easy wasn't it?

Lastly all we have to do is make the hat.
Measure your child’s head and add one inch to that. For my costume, that was 15″+1=16″. Then cut the fleece with that measurement for the width.  I used 7" for the how tall it should be.  Fold the cut piece in half and sew along the short side.


Now measure the width of the hat (not counting the seam) and divide that by four. For me, that was 8″ / 4 = 2″.   Put a pin this distance from the left and another one this distance from the right. Then I placed a pin 2 inchs up on the sides.  On each side, sew a row of stitches from the top pin down to the side pin.


Pick the hat up and squish the top end so that the gap opens up. Pull the top and bottom flaps so that the gap is closed, and you have what looks like a cross shape. There should be no hole in the top anymore. Put some pins in to hold it in place.


Sew a row of stitches on each new flap, going from the center of the top down to the same point on the other seams (1 1/4" up from the bottom)

Trim the excess and you should have a nice pointed beanie shape.  Flip it inside out and your hat is done!


As tempting as it is, don't eat this candy corn!
Have a safe and happy Halloween!
Cheers!

Sunday, October 2, 2011

Latest Creation

I have been away from creating things for over the past month.  It is because I've made the best thing ever.  A new person!
My sweet baby girl was born Sept 1, 2011.


1 very short month later she now looks like this.


It's hard to believe I could love somone as much as I love her.  Even at 2am!!!

Friday, July 29, 2011

Blueberry Jam

Being 8+ months pregnant in the dead of summer has left me with ZERO energy.  I've done very little of anything productive as of late.  But yesterday I did manage to make some blueberry jam.  I love a leisurely breakfast with Mr. Sangria on the weekends.  Usually we read the paper, have coffee and some pastry for breakfast, and catch up on The Soup.  Jams are relatively easy to make but they get such a big reaction.  Mr. Sangria thinks I've spent hours in the kitchen making him something.  Clearly that's never the case.  I proceed to tell him how great I am and then ask how many of his friends wives make homemade jams on a regular basis (we have a freezer full of strawberry and apricot jams).  The answer is none and I make him feel like he is so lucky and therefore should do something nice for me.  Like take me to dinner.  It's really a win-win situation.

I came across this jam recipe in a recent issue of Real Simple magazine.  I love that it doesn't require any canning equipment because canning equipment is a pain in the (--------) to use.  Blueberries are in peak season now so I've stocked up.  And best of all - there are only 4 ingredients.  When you use fresh ingredients you don't need a lot of other additives.


Blueberry Jam

Hands on time:  5 minutes  Total Time:  30 minutes  Makes 3 cups (which I've broken down to 5 seperate containers for future use)

Ingredients:
5 cups blueberries (I used organic)
1/2 cup sugar
1 tablespoon fresh lemon juice
1/4 teaspoon kosher salt


In a medium saucepan, combine the blueberries, sugar, lemon juice, and salt.  Mash with a potato masher or wood spoon until the berries have released their juices.

Cook over medium-high head, stirring occasionally, until the mixture has thickened, 18 to 25 minutes.  Transfer to containers and refrigerate for up to 1 month or freeze for up to 1 year.

TIP: This recipe can also be made with two 10-ounce bags of frozen blueberries instead of fresh.  Cook the frozen berries for 2 to 3 minutes before mashing, then reduce the total cooking time to 15 to 17 minutes.

Now I need to beg Mr. Sangria to stop at the store on his way home from work to get some good bread to slather this deliciousness over tomorrow morning.

Wednesday, July 20, 2011

Ruffle Embelished Cuff Bracelet

As I mentioned in an earlier post I'm busy "cleaning" out some of my closets and actually using items before going out to buy more.  I came across a bag of ribbons that I've had for over a year.  Some were purchased and others I've collected from various other objects.  I save all the ribbons that are on gift boxes, as I never know when they could come in handy.


I decided to make an easy Ruffle Embelished Cuff Bracelet.  I didn't use every item shown above but they were all great for inspiration.  The only item I had to purchase was the button which I got on sale from Joann's.


Baby Cinnamon Sangria making a cameo - you can't really see her as her baby bump is shy.


Not bad for taking scraps and turning them into glamour. 

Cheers!
Cinnamon Sangria

Monday, July 18, 2011

Cleaning leads to procrastination which leads to crafting

I'm supposed to be cleaning out a closet for Baby Sangria to make room for all of her clothes (she's got more clothes than I do at this point).  Her closet is currently my craft/cleaning/don't know where to put stuff closet.  So I've been slowly cleaning it out to make room for her.  I'm not one for cleaing, it's just not my thing.  Don't get me wrong, I love cleanliness but it's clutter that is my downfall.  I have lots of stuff treasures that I think, "oh, one day I can use this."  So I don't really get rid of things.  This also makes me a future prospect for the show "Hoarders".  In 20 years when you see me on that show you can say you knew me back when I was a Hoarder to Be.

Anyway, in my "cleaning" I came across some beads that I have had for quite a while.  It's been on my to-do list to make this necklace, bracelet, earring set for quite a while.  And this past weekend was the perfect weekend to do it.  Why clean when you can craft right?  I love this set because it's grey, silver, and white which pretty much goes with anything.  It can be worn day or night which is a plus in my book.


Stay tuned for more "cleaning" posts in the next few weeks!

Cheers!
Cinnamon Sangria

Wednesday, June 29, 2011

Diaper Clutches

It's been quite a while since I've last posted. I've been busy making items however I'm not very good with bringing out the camera most days.  Today I forced myself to take advantage of this beautiful So. Cal sunshine and take pictues of items that I do have handy. 

Today I wanted to share some diaper clutches that I recently made.  Big diaper bags scare me, I don't understand them.  I suppose this comes from not having a baby - yet, just a few short months to go!  But I can't picture myself taking a huge bag with me everywhere I go.  Yes I know one need diapers, perhaps a change of clothes, snacks, etc. for longer adventures but just for running quick errands I imagine these clutches will be more my style.  Just fill them with wipes and a few diapers and run to the store.  Easy and stylish!


Items will be listed in the shop next week when I re-open it.  If you see something you like before then please contact me at:  hello@cinnamonsangria.com
**Items shown may differ from items listed in shop due to a few events I have in the upcoming week.**

Wednesday, February 16, 2011

Baby Shower Gifts

A few months ago I had 14 friends who were pregnant so I’ve been busy making baby gifts. A few of these babies have joined the world and I quit keeping count of how many are still or newly pregnant. A few years ago I felt like I was going to weddings every weekend. Now it’s baby showers.

A good friend of mine is having her shower in the next few weeks and I wanted to make her something that I hope that she will find useful. A changing pad and diaper clutch for on the go. She has chosen to not find out the gender so I made this gender neutral.

The changing pad is reversible. Either chocolate or white, whatever she decides. A thin layer of batting in between the two fabrics keeps this soft for baby. The diaper and wipe clutch has no batting as I wanted to keep it light and let it fold easily when not in use. It should easily carry 2 diapers and a travel wipe holder. Or an extra onsie in case a change is needed. This is a perfect gift for those times when a busy mom (or dad) doesn’t want to lug the entire diaper bag around. The diaper and wipe holder is not reversible but I made 1 white on the outside/chocolate on the inside and 1 chocolate on the outside/white on the inside.


I also made her 5 burp cloths.  I just used leftover fabric and terry cloth that I had on hand.  I figure if you are going on have a burp cloth on your shoulder for 18 hours a day it might as well look good, right?


I had enough fabric left over that I made another set (changing pad and diaper/wipe case). This is the last of the fabric and I probably won’t be making any more (for the shop anyway) so if you like it get it while it’s still here.  http://www.etsy.com/shop/cinnamonsangria


Cheers!

Cinnamon Sangria

Tuesday, February 8, 2011

New Items

Hello Friends!

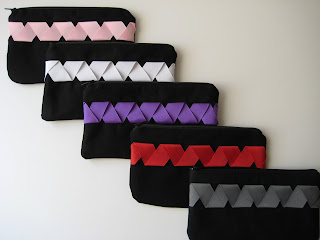
It has been quite a while since I've had the opportunity to blog.  The holidays were a busy time for us with a few trips to New York to visit Mr. Sangria's family.  Then of course the holidays themselves and I had good intentions to restart blogging after the new year but again life happened.  But I'm back.  I've been busy these last few days making these evening clutches.  


As of now the pink, white, and purple are listed on Etsy.  The red and grey will be listed hopefully by tomorrow along with a few other new items.
These retail for $20 each.  They make an excellent evening clutch.  I also use mine everyday to organize my lipstick, keys, mints, smaller items in my larger everyday purse.


More colors to come shortly.  Stay tuned!

Visit my etsy shop at:
http://www.etsy.com/shop/cinnamonsangria

Cheers!
Cinnamon Sangria